Pages

Monday 29 July 2013

ATC World - IF Swap

I now realise that, as I am a member of several Groups, it will be difficult to keep track of the various swaps I join, titles of swaps will double up!!
I have decided to add the Group name to the swap so there will be a few updates in my future postings.
But for today I want to show you my latest Iris Folded cards.
I bought the designs from Sylvia, a fellow Circle of Crafters' member, who sells the patterns to support her special needs Granddaughter.  
I printed out my designs and cut out the fronts of the ATCs after selecting several papers for the IF.
The Lampshade consists of a very fine paper with lavender wavy stripes one side and silver on the other side.  I varied the folded papers so that there would be reflections of light towards the top of the shade.  I used a sticker for the lamp stand which was a bit difficult to cut, if I fold this pattern again I will try to utilise something else for the stand. 
 
I used a slightly heavier paper for the Post Box as that was the only one I had in the bright red - pillar box red!!
I used the waste from some Peel Offs for the Iris and also for the letter.  I did outline the opening but unfortunately, the ink rubbed off onto the card.  I placed a flower Peel Off on the side.


 I tried to convey a grass path for my 'legs' to be stepping out.  I used a floral vellum for the borders and dark green leaves for the path.  The rest of the border was pale green vellum with printed daisies.  I am happy with the finished result but............ looking at the cards they looked very bare...........

I found matching Peel Offs to make some corners but unfortunately, because of how I had positioned the Post Box, there was not enough room for the Peel Offs so I rounded the corners and left it at that.
They were posted off this afternoon so watch out for the update........

UPDATED - 24.08.2013


I think this is my first cupcake one - beautifully folded.
Thank you Becky


A regal pussy cat sat upon a mat of sequins
Thank you Sandie 


A great dress and quote here, love the detailing.
Thank you Valerie  

Thursday 25 July 2013

ATC World - Russian Nesting Dolls

I had visions of bright reds, yellows, greens and blues - basic kids colours!  It didn't really happen but in the end I am very pleased.
I printed off several 'doll' images and then settled for my three for the swap.  Using my watercolour pencils I coloured one of the images - not the shades I wanted.  I used some gel pens for a trio of dolls image but not quite what I'm looking for............. I used felt tips for the third image and although it was certainly brighter - sunglasses needed - still not what I was looking for.
I put them to one side and then mythered for a week, one night as I lay awake - Bingo! - you know how it does ................ Russian text behind one of them and washi tape behind the other!

At some point in the day, my desk looked like this  .........

I have watercolour washed the trio image, spritzed the text background and applied home made washi tape to the third one.  


I edged this card with red ink and added a rose to my brightly coloured one - I didn't think it needed anything more.


I found a piece of border on another Russian text image, PVA'd the whole card, added a small, red feather ?! and edged the border with gold ink.  Another coloured rose was added.

I used Crystal Lacquer on the faces of the dolls, then printed the Russian name for these dolls and placed in the top right hand corner.  While using the PVA I found that it peeled off my plastic sheet like a clear film so I placed some of it over the 'corner' of the print and it stuck!!  
Must remember that one!  
Add a flower and there are my three cards ready to post.   Hope these ones reach their destination ok and in time.................
UPDATED: 6th August 2013
Postie brought me presents...........

 Beautiful Iris Folding, love the background paper
Thank you Becky 


Many layered one with a 'Russian Feel' to it
Thank you Colleen 


These dolls were outlined with blue pearlised Peel offs and pretty daisies
Thank you MaryAnn 


Monday 22 July 2013

ATC World - Under the Sea

You do not want to know how many times I have attempted to make these ATCs but I will share with you that I have learned that when embossing ........ it is possible to remove layers and almost start again!!!
I found these first two images in my Dover folder  and the third one is from a file that I have marked 'Colouring Pages' - good title!  So after I had printed these out, I then watercoloured them (using pencils) and left to dry.  


I  spent a lovely day embossing all the pictures.  

I had a wonderful time - including the late tea!

However, I had added some blue to the Koi and the Seahorses and didn't really know if I liked it or not.  After showing it to PJ, who promptly said 'what's with the blue?', and I had explained 'sea?'  I thought I would have a go at removing it.  Worked perfectly on the seahorses but not too good on the Koi. 
 I re-embossed the cards and then, in my stash, found some appropriate words so adhered them and embossed the whole of the card again.  
I had to research the Blue Tang fish as I only had the B/W image and was very surprised to find that they were a really bright blue - you google them, they are works of art in themselves!!
I added the backs and they are posted off ............. we will wait and see what swims back to us.............


UPDATED 24.08.2013 showing my great returns..........


This is a very pretty one with great embossing.
Thank you Andrea


Love the peel offs, all gilded and shiny
Thank you Pat C


Pretty metallic peeloffs and gilding along the base line - and a little dangly!
Thank you Fareeda


Sunday 21 July 2013

ATC World - Keys - Love Padlocks on Bridges

I first heard about these from my friend Peter on his Blog.  
When the theme of Keys came up for a swap, I immediately thought of this bridge but looking it up on Wiki I found out that there are a lot more bridges and padlocks about.  
I downloaded and printed out eight bridges, placing their City names on the photo and decided that I would use these as my background. 


I poured Crystal Lacquer on the padlock parts of the pictures and left to dry.  
Stamping parts of the remaining picture using the ink pad itself gave a bit more colour to the scene.  I found a few sticker keys and added them - one to each photo - and then heat embossed the City name.

I wanted to add a bit of grunge so tried to print some keys on tissue paper.  Not very successful but then I thought of taping just the sides of the paper to an ordinary print paper - voila!!.  


I then PVA'd the whole front and pressed the tissue paper over it, this meant that the background picture remained viewable, although I did gently rub off the tissue from the Crystal Lacquer.
I went over the City name again with self coloured pen and then made a hole to add my keys.
I used some brass brads to attached the keys that I bought the other week from Craft-Shed and then touched up the brad with a black felt pen in order to grunge it up a bit.

I now have these three ATCs ready to post off to my Hostess.

UPDATED 24.08.2013 to show off the lovely cards I received by return...........


Love the clouds on this card.
Thank you Katherine W 


 Another very pretty way to use up corrugated packaging, and embossed background!
Thank you Kathy C 


Love the detailing on this Key card - must've taken ages!!  
Thank you Lucie 

Wednesday 17 July 2013

ATC World - Pirates

Avast there me hearties!
Tis treasure you be looking for?  Then look no farther ........
Here be the man with the map!


This little lad is courtesy of Spyder's Corner, I printed him out and pencil coloured him and added Parlay! but the exclamation mark made it too long!  I clear embossed the whole picture and then added a couple of 'gold dubloons'.


This lady is stunning!  She is sketched by Giselle, I printed her out, pencil coloured her and then gave her a wash.  When she had dried I cut her out, clear embossed her and laid her to one side.  On the base card I cut two sayings from the web, then gold embossed the join and edges.  After I had attached the Pirate Lass I added a gold heart.


This sketch of a pirate ship printed out very orange so I embossed with several stamps, a black border, feather and watch face.  
I then added blue and green map remnants, then to bring it in line with the others added three gold dubloons! 

There you have it me hearties, they walked the plank and I ain't seen 'em since ...... down with Davy Jones methinks!

UPDATE:
It would appear that no-one could wait for my Pirates so they arrived with the Hostess too late  - all the treasure had gone............. they are being returned to me.

Friday 12 July 2013

Geckogalz Swap completed

Way back in April when I first started making these ATCs, I joined a couple of groups.  
The Geckogalz website looked a very busy site, plenty of swaps, sales and blogs so I followed the link and joined the group.  The first swap was 10 / 10 - I send 10 and get 10 different cards back - this looked a good way for find out exactly what ATC cards are!!   So I made 10 cards - post - and sent them off.  

Many emails were sent, one girl had reneged so 'did we wait or carry on but be one short' - we said 'carry on', then we were informed that they had been posted to us............... nearly two weeks later they have arrived - certainly worth waiting for!!


Love the envelope idea from Diane.  The lining is a larger format of the backing paper on her ATC - or is the backing paper a smaller version of the lining?
Thank you Diane   


The gold extension and ribbon are totally different to anything I have seen.
Thank you Jess.  

I just love Japanese so really appreciate this one.
Thank you Margie  


These two speak 'Geckogalz style' to me, using lace and ribbons.


Thank you Heather

Thank you Deb


A vintage beautiful lady with pearls.
Thank you Helene


Mixed Media with embossed flowers.

Thank you Beverly


 and............ 


The shiny coffee card was held in place on a take away coffee cup!
Thank you Penny


The glittered and altered  strawberries came held in place on a giant strawberry.
Thank you Barbara

Wednesday 10 July 2013

Circle of Crafters - Cities of Choice

Paris!
There is no other city for me!


I printed out a page of stamps to size and then decorated with gold peel offs.


I printed out the Eifel tower and then over-stamped with words and flowers.  I placed a glittered lilly peel off in the corner.


This one is Paris!   
Eiffel Tower, couture, feathers, hearts and roses.

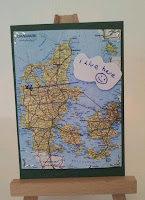
I have received the following ATCs wrapped with a very clever card from Karen:-


There are two 3D Decoupaged scenes, one with the mountains decoupaged


and one with a Bridge across the river decoupaged.  


The boulders are also decoupaged 
(I have tried to show the decoupaging with a side view but I am afraid it is not all that clear).

 It looks a fantastic place to live ...............   

BTW ....... 
it is in Denmark!  

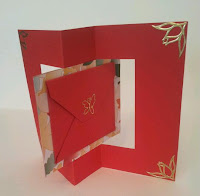
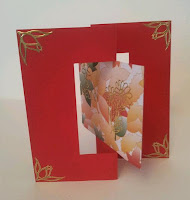
Karen enclosed a little note to me inside this wonderful card............


Front view...........


..................back view


and one of the note. 
I love all of it!  Thank you Karen

Tuesday 2 July 2013

Fun with ATCs Challenge #91

I don't remember subscribing to Fun with ATCs Blog but I am so glad I did.  The new post dropped into my mailbox this morning and I thought that this challenge sounded too good not to enter.
I have a printout of daisies which I painted up yesterday. (as it is on watercolour paper!).  No reason ..........  just felt like it........... made quite a few actually..........
But when I saw this challenge I knew that I would be able to use my painting.

I did not colour the daisies so I thought I would clear emboss them but the embossing pen remained blue which meant the original clear embossing showed on the paper as blue........... and we all know daisies are white!!!  
I added some white puff embossing powder to the daisies but it was not very good, guess I am going to have to go and buy all new stock in order to continue my embossing life ......... no!  honest!  non of these powders are under five years old, not been touched for at least that long.  
I then added some printed words and when they had partially dried added a layer of clear glitter embossing.  The words remained only partially flat so I embossed the whole card again and it has given it a beautiful finish........  flat but 3Dish.

Etegami

 I finished the Etegami card and promptly lost it . . . . . Not really . . . It disappeared into here . . . . . Along with a Dragon Card and...