Pages

Saturday 28 September 2013

ATC World - 12 + 11 Days of Christmas

This is an interesting premise......
Creating the twelve days of Christmas two at a time!!
I selected my designs and went to work.............
I created some word bubbles using Wordle and printed them out ATC size in different colours and fonts for my backgrounds for the whole set.
12 Drummers Drumming
............... the number twelve was cut out in purple glitter paper.  I then adhered these numbers to one of the backgrounds and left to dry overnight.

I smoothed clear glue over the whole card and then, while the glue was still wet, placed some pieces of Dried Glue over the whole, shook on some glitter powder along the digits and then placed the text gently on top of it.


If you look carefully you can see the Dried Glue pieces on top of the figure one.


I found this out of copyright picture of FEMALE Drummers - brilliant!


PVA secures them and shines them up.........


I just love the colouring pictures on this site!  I coloured this one with my faithful watercolour pencils and fussy cut it out.  I used sheet music for the background so that my Drummer could stand proud.  A coat of PVA give it a finished look.
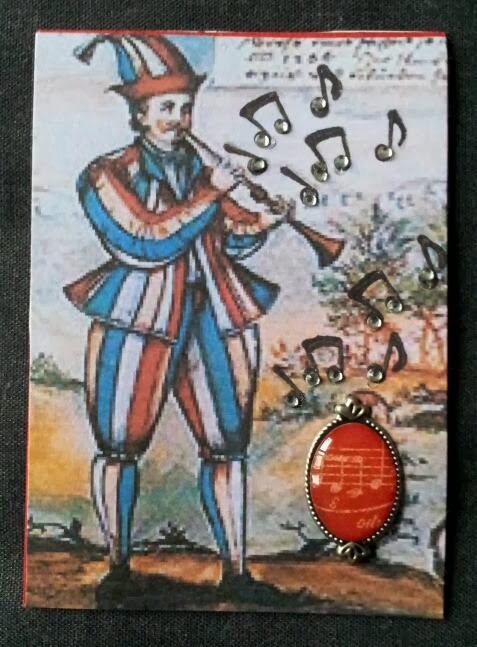


11 Pipers Piping
.........After printing out this picture, I covered it in Crystal lacquer and left to dry.
The paper buckled, the lacquer ran outside the lines, someone (!?!!?!) managed to put some doileys onto it while it was wet so smudging it!

Not good!!

Soooooo..........

I fussy cut that medallion, pierced a hole at the top, thread some green raffia through it and then attached the ribbon with double sided tape to the background. After using a gold gelpen to edge the medallion,  I added a green raffia bow and used a 3D sticky pad to attached the medallion.


I used the faux silk method to make this card.  I covered the background with a layer of tissue paper, left to dry and covered with another layer.

I printed out the text - Eleven True Disciples - onto a sheet of Tissue paper and then attached this to the previous layers.  I am not sure whether this has worked but ....... if I add anything else I think it would be overpowering ........maybe a plainer background another time.


This picture is full of movement which I didn't want distract from so I only used a gold pen for the 'pipes' and gave them red hats and black shoes.  I will update and give credit for this digi as soon as.


UPDATED:-02.11.2013
I have received the following cards:


Thank you Kathy H


Thank you Lori


       Thank you Kathy S


 Thank you Sandie H


Thank you Jan G


Thank you Kathy S 

Friday 20 September 2013

CWS Under the Sea

Our second swap with Card Work Shop and I have chosen Under the Sea for the Theme.
I printed out my chosen designs, a seahorse, an embroidered fish, a dolphin and a turtle.

I used the Faux Silk for the dolphin using blue tissue paper and put to one side to dry.

I cut some shells and some sentiments out and then attached the sentiment onto the card.  I used a glue stick to cover the whole card and put to one side to dry.  When dry I attached the shells and covered them with a thin layer of Crystal Lacquer and put to dry.  Attach the backs and round the corners - all done.


The seahorse was coated with a thin layer of light yellow Crystal Lacquer leaving the eye socket uncovered before I cut it out.  After it had dried I covered the eye socket with clear lacquer and left to dry again.  I sorted all the sentiments and when I had chosen the one for this card, I chopped up the words and sealed them down.  Now I colour washed the whole card with a pale blue wash and set to dry.  When dry I rubbed a glue stick over the card and then corner rounded it.


I managed to find matching threads for the fish, edged it in gold backstitch, stitched the bands in satin stitch and was going to add stones but decided enough was enough so I just added the words.  In my opinion, this photo does not do this card justice as it sparkles so beautifully.

My three cards ready for the swap .............
UPDATED 26.11.2013
My swap cards have arrived!


I have tried photographing them at different angles to try and show off the shimmery and shiny background.

Thank you Melody  


Wednesday 11 September 2013

ATC World - Embossed Backgrounds

At first I didn't really think I could enter this swap as I don't possess an embossing machine but, after a discussion with members of the Group, it was agreed to use embossing boards and/or stencils, so I decided to see if I could rise to the challenge.

I knew that I had some Glitter Girls boards which I bought yonks ago and while looking for them I found my Fiskars Shapeboss.  I spent a lovely half an hour going through all my sheets and deciding which sheets I would use for the embossed background.


I used different portions of the stencil sheet to produce a pattern.
I used a pre-printed background and embossed a spray of flowers with a few daisies across the top, then I swiped ink pads over the design.


A different background on this one needed a plain embossed pattern so I used a corner pattern and then turned the card round to emboss the other corner.  A quick swipe with an ink pad to finish.


I felt a bit more confident now so I used several patterns to form this design.  A flower design was carefully embossed in each corner matching up one of the ribbons.  A semi-circle design, twist the card and behold! a circle.  As the card had a pearlescent finish I decided to swipe with a gold ink pad - not a good idea as the ink pad was dry.  This led me to try my other pads - copper worked somewhat.

Distraction here led me to test all my other inkpads on precut ATC cards............ I can see that I am going to have to buy some new stock.  Some cards had a visible oblong in the centre, other not so visible but none of them exactly brilliant!!

Back to the cards...... I spritzed them all with my faithful spritzers and put to one side to dry.

I embossed some metal foil tape using my Fiskars Texture plates, and was very pleased with the result. I carefully removed the backing and sealed it onto a backing card.  I straightened out the edges and then swiped with an ink pad.
The next day I gave the first three cards a coating with PVA and left to dry.

I think I will enter card numbers 1, 3 & 4 for the challenge.


UPDATED:-

Beautifully embossed and chalked.
Thank you Jeri.


Heavily embossed and gilded.
Thank you Luze.


A very neat script embossing.
Thank you Kathy S.

Tuesday 10 September 2013

WOYWW #221 Swap

During WOYWW visiting, another desk offered to swap with me.


I made these Faux Silk cards and decided to send one of these.  I didn't scan the card, it was the same poppy but different words.


I received this card this morning and it is so lovely, an inspirational little card was enclosed along with some punchings and it has made me very happy.

Thank you Robyn


Monday 9 September 2013

Faux Silk

I saw this project on the web - Technique Time Tuesday - and thought that I would give it a try.

 I stamped a couple of flowers (Pansy and Poppy) onto a sheet of tissue paper so that I had five images, leaving a large margin round each stamping.


When the ink had dried, I used my watercolour pencils to colour the poppies red and the pansies purple, varying the shading so that I had five different images.
I cut between each flower and then screwed each piece of tissue into a small tight ball.

Each little ball was gently teased open and put to one side to 'rest', it was still well creased but they were needed.  I cut my cards to size and rubbed a glue stick to cover each one.  I then gently pressed each coloured image onto a card, leaving some of the creases showing and put them to dry overnight.


The next morning I added pre-printed words to the cards and then gave each one a covering of PVA and left to dry again.  I noticed that some of the colour had run, so next time I use this process I shall colour with felt tips, or wax crayons, or pencils.
I edged the cards with a matching ink pad, attached the backs and corner rounded them to finish.


This process is called Faux Silk and produces a very different finish which I must admit I quite like.
The fifth card has been sent for a swap- see later post.

Saturday 7 September 2013

ATC World - It's a Sho'in

Shoes!
Who doesn't like shoes?!?!
or Trainers.......

I used a background which I printed out many months ago which was stored in my box.  I then added some peel offs, one silver, one gold, one grey.  The only word I could think to go with that was......keen!!!


Then there's boots..........
This digi from Creative Hands is ......priceless!!
I watercoloured the digi and then left to dry.  When it was dry, I colourwashed the whole card and then applied the sentiment.  I then gave the whole card a coating of PVA glue and set to one side to dry thoroughly.

Now we come to the real deal...........
Shoes.       Shoes.       All sorts of shoes.         Well, sketches of shoes!!!
I coloured the shoes, and the flowers, with my watercolour pencils.  Tissue paper seems to be the in thing with me at the moment so I tore a piece just big enough to cover the lower corner of the card.  I scribbled 'Mine!' approximately where I thought the some of the shoes would be and then screwed up the paper into a small ball.  I opened the paper and, using a glue stick, rubbed glue over the bottom of the card and pressed the tissue onto it, slowly and gently so that some of the creases were left in.  When this had dried, I covered the whole with a layer of PVA and left to dry.

UPDATED:-


Love all these cards ....

Lots of little shoes.
Thank you Jeri.

Beautifully decoupaged tiny shoes.
Thank you Jo G. 


Painted, drawn and collaged wonderfully.
Thank you Tessa.

Tuesday 3 September 2013

UKATC September Monthly Swap

Although we are having sooooo much trouble with Yahoo Groups, our honourable leader still managed to set up the partner list for September. Yeah!

What to send ...............


A Giraffe


A floral one named after a film!


and one of the earliest ones I made with a new stamp (at the time!)


It all seems a long time ago now that I ventured into this world....... but how I'm loving it!

WOYWW #772

  WOYWW - All the deets on how to link up etc. and, more importantly, why you should, can be found at the top of the page.  Thank you Julia ...